Tuesday, November 1, 2016

Thanksgiving Decorating

Decorating the house is my favorite part of this season.  There's Halloween, then Thanksgiving and then the big daddy of all holidays....Christmas!  But let's not get ahead of ourselves.  Halloween is now over so let's start thinking about decking the halls for Thanksgiving!

You don't have to spend a fortune on Thanksgiving decorations.  Anything with pumpkins, fall food inspired decorations and, of course, candles.  Let's start with the candles.

Candles can be your best friend when decorating for any occasion.  There's so much you can do with them and you can use them for every theme...over and over again.

You can wrap them with pretty leaves from your yard.....


You can tie cinnamon sticks around them with twine.....

You can leave them plain and simply decorate their holder.  How about layering corn in a glass candle holder?
 ...or various dried beans?

Pumpkins, squash and other like vegetables are another great way to decorate.  They aren't costly and hold up really well for about a month at a time without turning to mush.  You can paint them if you don't like them naturally, you can garnish them with glitter or glue buttons on them....the options are endless.  I will warn you...if you are going to garnish them...do not puncture them or the insides will begin to rot and you will have a horrible mess on your hands.  Always glue your garnishes on.
You can even make candleholders out of them!  This idea will require you to scoop out a bit from the middle in order to get your candle in there.  This will hold up for a week or so before it begins to rot so I would save this idea for a dinner decoration or maybe if you're planning a party. 
Or you can leave them as nature made them and surround them with other fall items for a homey centerpiece.
How about a fun treat for the kids?  Look how cute these Oreo turkey's look!  I saw this idea at www.ourbestbites.com  They look yummy!
If you're looking for a decorating project that the kids will enjoy, try turning pine cones and feathers into turkeys.  Easy, not at all messy and super cute!

All it takes to decorate your house for the holidays is a little imagination, a little scavenging for the items and a few minutes of your time.  Simple, inexpensive and gorgeous!

As always, enjoy your space!


Friday, October 7, 2016

Need some Halloween decorating ideas that are easy, cheap and unique?

I love Halloween!!  Love it!  The best part is decorating the yard so it spooks everyone out.  That can get really expensive really quick.  So......how about making some great decorations on the cheap?

It should also be said that I am not an artist type.  I can't sew, I can't draw, I can't paint a picture.  So these ideas are perfect for me.  They look really creative and artsy but I don't have to have talent to do any of them......I like.

Let's look at some!

Who's not afraid of a giant pumpkin spider????

Oh no!!!!  They're having a ghost meeting on my front lawn!!!!  
Seriously, stick some brook sticks in the ground, glue some felt on a sheet and then drape the sheet over the broomstick.  Done.


Now I have dancing ghosts??
For this one, do the same as the previous one.  Only this time, staple their "hands" together and tie some string to give them waists and necks.

With all those ghosts there has to be a cemetery near by
I prefer to use blocks of Styrofoam for this project but you can use 
cardboard, plywood, or anything else that you can stick in the ground.  I paint mine and 
then hammer a few paint stirs in the ground in front and in back to keep these from falling over.

ZOMBIE PUMPKIN!!!!
I think this one is really self explanatory

I need to bury this guy!
This is a cheap plastic skeleton, an old wheelbarrow, a shovel and some sand.  Done.


Man eating shrub?!!  Oh no!!
Again, pretty self explanatory.

I'm watching you!
This one is my favorites.  It's just so easy.


Now go out and terrorize the neighborhood!

Monday, August 22, 2016

Interesting Things to do with Used Books

Books are treasures to me and the thought of destroying one by making a safe or a side table or a shelf is nearly more than I can bear.  However, not all books are really worthy of saving.  I've read some pretty awful books in my life.  So these are the ones I choose to sacrifice.  Many thrift stores or even dollar stores offer hardback books at anywhere from $.50 to $1.00 each.

How about a book safe?  Easy to make!  Select your book, glue the pages together in two sections (one for the "lid" and one section to hold your valuables).  Then using an exacto knife cut the pages to a depth suitable.  Finally glue felt into the hole.  Done!


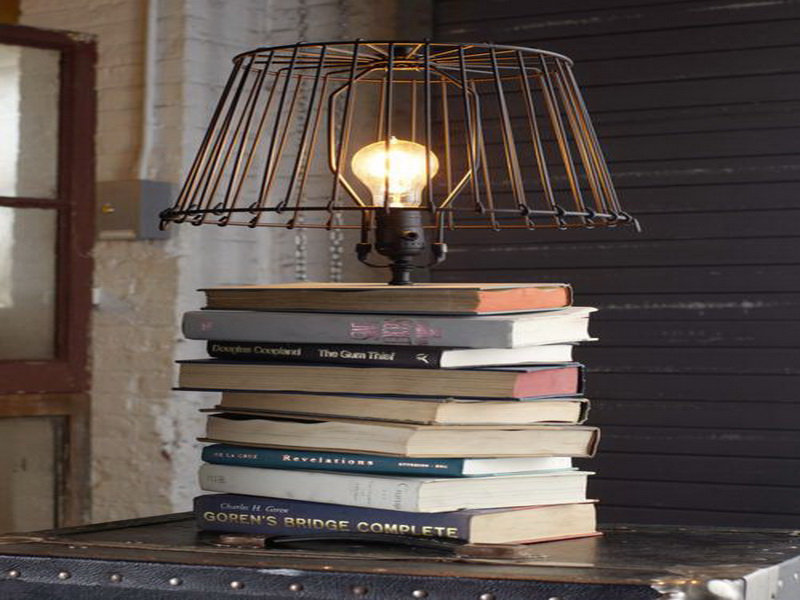
Now let's look at making a lamp base out of books!  Again, super easy to make.  Align your books to get the perfect angle, drill holes in the middle, glue the books together and thread your rod.  Done!


Another idea for books is making a book table out of them.  Same instructions as above.  Drill the holes, glues the books together but this time instead of inserting a rod, try using something a bit more stable like a couple of thick (and long) dowels or even a wooden pole or broom handle that you have cut to size.  Then you can either lay a piece of glass on top or put a thick coat of poly on the top book to keep any spills from ruining your work.  


Lastly how about making a shelf out of books?  Buy metal  shelf brackets.  Drill a hole where the screws go, screw the book securely to the bracket and install on the wall.  Done!  It really is as easy as that.


Now head to the thrift store and snap up some hardback books with interesting covers and get to work!

As always, enjoy your space!

Monday, August 1, 2016

Head Planter Anyone?

I love to roam the hometalk website.  They have such cute and inexpensive ideas that I love to try!  Below is one of those cute ideas!

While browsing thrift stores do you ever see one of those styrofoam heads that folks use for their wigs?  Snap one up the next time you see it and make a whimsical unique planter out of it!  It's super easy.


First simply cut the top off the head and dig out the insides to the depth of your choice.  Make certain not to cut too closely to the bottom or the sides because you want it to be sturdy enough to hold your soil and plant without collapsing.


Once you have the head emptied, grab your spray paint, exterior paint or even some waterproof makeup  and go to town decorating your new planter.  Glasses and jewelry make it extra cute!


Once it's completely dry, it's time to fill it up.  Be careful when choosing the plants for this planter that you get plants that like shallow areas.  Vines, ferns and succulents work really well for this project.

Once it's decorated and planted, you can place the head on a garden spike, glue it to a board to help prevent it from toppling over (it will be top heavy) or just place it on the ground among your perennials.

I think they're super cute!

Enjoy your space!


Monday, July 4, 2016

Forget paying top dollar for lamps and lampshades!


Nothing adds ambiance to a room like lighting.  Absolutely nothing.  Well placed lamps will make a room.  I have multiple lamps in every room.  A dark unadorned corner will become a cozy glowing oasis with the simple addition of a nice lamp.  However, really nice lamps are really expensive.  Especially now that the lighting industry has seen fit to charge separately for the shades.

A really nice decorative shade can run you $50 and more.  Add to that the price of a nice lamp and you're looking at well over $100 investment.  That's too much.  So how can you achieve the same look for a small fraction of the cost?  Make your own.

The beauty about making your own is twofold.  (1) It saves you tons of money and (2) you can customize it to fit your decor.

I love thrift stores, flea markets, yard sales and of course curbs/alleys.  If the lamp doesn't work or you question the safety of the wiring...take it to your local electrical shop.  They'll check it out for safety and function and they will even rewire it if you don't know how.  Rewiring a lamp is not difficult.  You can buy the kit from any hardware store and even from stores like Walmart, Michaels and Home Depot.  Follow the enclosed instructions or watch a video on YouTube and you're ready to go.  

The most important thing to remember when shopping for lamps and shades to redo is simplicity.  Until you feel you are really really good at this, skip the pleated shades and the ornate lamps.  Go simple.  Once you've done a couple of lamps and feel really confident...then jump to the more lavish designs.  Of course, if you aren't going to redo the lamp....then pick whatever makes you smile.

To adhere your covering of choice, you can use hot glue, spray glue (like you might use in scrapbooking) or even good old Elmer's glue.  I have even stapled fabric to the shade and then glued ribbon around the edges so the staples wouldn't show.  It will take you a little practice to get it flat and smooth since you're working with a circle design in most cases, but it won't take you long.  Of course, if you are opting for spray paint, you are in for a quick and super easy job!

There are tons of options for you in this project.  You can use fabric (my personal favorite because it adds texture as well as visual interest).  You can spray paint, stencil, use wallpaper...you can even hot glue twine, rope or ribbon on it.  How about using newspaper, pages from magazine, sheet music, maps or even print off some black and white photo's to glue to the shade!  If you are at all artistic, you can even draw your designs on the shade using a sharpie.  I promise the options are boundless!

Another interesting thing to do is paint or cover the inside of your shade.  Then when the lamps on it will produce a wonderful glow and effect.  Completely unique.  No one else will ever find another just like it.

Below are several pictures to jumpstart your creative juices!  

This shade has fabric covering the inside

Look how gorgeous this shade is after the interior was spray painted a wonderful gold!

I love the solid color on the outside and a punch of fun design on the inside!

This lamp and shade has been spray painted.  I love that they painted the inside of the shade the same gold they used as accent on the base.

Here's another lamp/lampshade that was completely spray painted.  Love it!

Look at this elegant lamp!  They spraypainted the shade, glued silver beading on the base and the end result is stunning!

How about spray painting the base and then just adding a few items of interest to the edge of a plain white shade?

Cute!

I love this sisal covered shade.  Visit the site noted on the bottom right of this picture to see even more great ideas!

Like frilly?  How easy is this idea?  

If you are good at pleating, this fabric covered shade would be such a fun design!

Wallpaper or even contact paper is a great thing to use to cover your shades.  
Note:  Sometimes the glued backing will let loose after time due to the heat of the bulb.  
I recommend either stapling the edges or adding a line of hot glue to give it more strength.

More wallpaper!

Here's another easy fabric idea.  Instead of gluing the fabric to the shade, just make a cute cover for it that can be switched out as your design mood changes.

Magic Marker shades are super cute!  I like that they painted the lamp base!

How about a stenciled shade?  Cannot get easier than this!

Music lover?

The Silver Boxes site had this great idea!

Old newspapers or magazines look great!

Now that you have a few ideas....go find some lamps and give them new life!
As always, enjoy your space!

Saturday, June 4, 2016

Time to plant!!!!

This time of the year, I get precious little done inside my home.  The outdoors screams my name everyday so I find myself outside more than inside.

I'm a voracious nester both inside and out.  I love the feeling I get whenever I step into my house or outside to my yard.  Do I live in a mansion?  No, not at all.  I live in a comfortable house with a comfortable yard both of which are filled with personal items that I love, make me smile and bring back fond memories.  To me, that's more important than any zip code or price point.

If you're like me, you are on a budget all the time...sigh....so how do you possibly liven up your outdoor spaces without breaking that budget?  If you're a renter you certainly don't want to go to your local nursery and buy flowering trees and expensive perennials to plant in your yard because you can't take them with you when you go...well...not legally.  Nearly anything can be grown in a pot if it's the right size for the job and you can take them with you when you move.

The thing I love most about pots versus in the ground flower beds is the fact that I can arrange them anyway I want, I can switch them around with relative ease when the mood strikes me and (most of all) I love the color, textures and height that planters bring to my yard.

Let's look at some examples!

I hate monochromatic interiors and I hate monochromatic exteriors.  Where is it written that everything outside absolutely must be green or brown??  Break up that color scheme with some lively colors!  This picture shows my absolute favorite trick of the garden....place a pot upside down and then place another one on top to give added height.  Sometimes when one of my pots gets a crack in it that makes it unusable, but I love the pot, this is what I do with it.  I just flip it over and put another pot on top.


While the example below is more formal than I like, I do love the whimsy of it.  I love making little pathways in my garden that ultimately lead to a bench, seating area or maybe a beautiful fountain.  This is especially a great idea if you have an area in your yard that has become overrun with weeds and you just can't get the grass to grow thick and beautiful.  Instead of a muddy spot...make it a beautiful spot!


I cannot stress enough the importance of staggered heights in your garden.  If you place all of your planters on the same level and they are fairly all the same height...it begins to look more like an aisle in the garden section of your local big box store.  Stagger the sizes and place some of the pots on top of bricks or other pots to make them tower over the others a bit.


I cannot tell you how many birdbaths I have discarded because they stopped holding water...I sure wish I could find them because now I know what to do with them!  Succulents & ferns work best for this feature because their root systems are shallow meaning they don't require as much "down room" for them to thrive.  Make sure to line the bottom with pebbles so to encourage proper drainage.  I love it!


Look at this idea!  An old shoe organizer turned into a fantastic hanging herb garden!!  I've thrown a lot of these things away too!


I am a sucker for old windows and shutters!  When I see them at the curb....I grab them.  Hanging old windows in your garden or replacing the glass with mirrors is absolutely my favorite thing to do!  I also love using old shutters as a type of privacy "fence".  However, I had not considered making a planter out of shutters!  These shutters break up the empty wall space really well.


Everyone knows how I feel about wooden pallets!!!  The uses for these things are absolutely endless!  Well...here's one more use for them!


Below is a completely finished and absolutely gorgeous patio area!  The egg chair can be rather pricey but if you have an outdoor rocker, that would look stunning there too.  The wicker chairs can often be picked up at thrift stores for little money.  A couple of cans of outdoor spray paint later and you have stunning chairs that look like they cost hundreds of dollars!  Notice the galvanized tub planters?  Now you can buy the tubs that are specifically marketed for planters for anywhere from $50 to hundreds of dollars depending on where you go.  OR you can go to your local hardware store and buy them for $15 to $30 and achieve the same look.  Of course, my picture would include pallets in there somewhere....love the pallet "coffee" table.  As for the rug, I recommend buying an outdoor rug with NO color on it.  Just a plain sisal or weaved rug.  That's because the less color it has already...the cheaper the price.  Then tape off the stripes with painters tape and spray paint that rug in whatever color you like.  Some of these already "painted" rugs can run upwards of $300 while a plain one can cost as little as $50 and the cost of spray paint.  Yes, this picture has my two favorite things in the world....wooden pallets and spray paint.

End of the day, your outdoor space is a blank canvas just waiting for you to paint your perfect picture so make it a masterpiece!

As always, enjoy your space!